Tuesday, June 29, 2010
Technical Notes on Suppliers
In this case we need to remove the TCA data in order to load the record successfully. Here is the query to find the records which are in TCA but not in AP.
select hp.*
from hz_parties hp
where created_by_module = 'AP_SUPPLIERS_API'
and party_type in ('ORGANIZATION', 'PERSON')
and not exists (select 1
from ap_suppliers ap
where ap.party_id = hp.party_id);
If HZ: Generate Party Number is set to "Yes" the Supplier Number is supposed to be system generated. In order for the profile to work correctly the DQM Staging Program from Trading Community Manager responsibility.
Supplier contact information is stored in two tables - HZ_PARTIES and HZ_RELATIONSHIPS.
There are two rows created in HZ_PARTIES table with party type PERSON and PARTY_RELATIONSHIP. Party is stored in Subject_ID and Object_ID. If you know the contact Party_ID, you can get the associated Relationship ID with the following sql query
SELECT Party_ID FROM hz_relationships hr
WHERE subject_id = party_id of the contacts PERSON type HZ_PARTIES ;
OR you can also query this way
SELECT subject_id FROM hz_relationships hr
WHERE party_id = party_id of PARTY_RELATIONSHIP type HZ_PARTIES
AND subject_type = 'PERSON'
AND relationship_code = 'CONTACT_OF' ;
Monday, June 28, 2010
Technical Information related to Suppliers
in all OA pages. Here are the steps to get supplier related table information. From suppliers page click on About this page link. Click on expand all to see all the view objects used by the supplier page. For example SupplierVO and SitesVO.
Representation of suppliers in the Trading Community Architecture (TCA) is new in R12.
The PO_VENDORS table is replaced by AP_SUPPLIERS table. When you create a supplier in AP a record is populated in HZ_PARTIES table. The party_number column is the registry_id in the create supplier form. The HZ_PARTY_USG_ASSIGNMENTS table stores party_usage_code which lets us know if the record is supplier or customer. POS_SUPPLIER_MAPPINGS table holds the mapping details between AP_SUPPLIERS.VENDOR_ID and HZ_PARTIES.PARTY_ID.
Information of the PARTY_ID, TCA_SYNC_VENDOR_NAME and TCA_SYNC_VAT_REG_NUM are also populated in AP_SUPPLIERS table. Also when you create site for a supplier, information is stoder in AP_SUPPLIER_SITES_ALL.
Thursday, June 24, 2010
Continuing Suppliers in Payables
On this page you can enter additional information for the supplier, the navigation bar on the left side of the page helps you enter more details.
To enter organization information to record company, structural and financial details click on Organization under quick update.
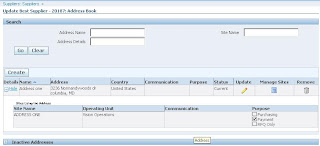
The next thing is defining supplier sites, for which you need to define address for your supplier into order to tie them with sites. Click on Address book.
On the address page click on Create. Enter the mandatory fields country, address line 1, Address name. If you select update to all new sites created for this address then the communication details will be defaulted to all sites created using this address.
Click continue. Select the organization to which you have access and click Apply and select your operating unit. This can also be achieved when you click manage sites from Address book page.
Define contacts for supplier sites by clicking contact. Once you are at the contact directory page you can click on create to add contact details. You can also create a user account for this contact and grant him the appropriate restrictions. Once you are done please click on Apply. When you are creating a user Email is mandatory field.
Define tax information for income and transaction. Click on Tax details. Here you can enter tax info for supplier, withholding tax at site level if it is allowed for this supplier and also allowed for the org to which the site is allocated. Allow withholding option is only enabled when the withholding option is enables both at the supplier level and payable options at operating unit.
The business classification page is used to enter supplier’s ownership information. After you have entered the data and save it the status changes to pending. Once the administrator reviews and classifies, the status changes to approved.
Later this session I will upload some screen shots of supplier creation.
Wednesday, June 23, 2010
Suppliers in Payables
Make sure the supplier you are entering has not already been entered in the system. To verify already the supplier exits you can run a concurrent program Supplier Report. The following lookups have been defined in Purchasing and Payables, for example Pay Group and Supplier type. Financials options have been defined.
1. Click on Create Supplier.
2. Choose Standard Supplier as supplier type. One can create a hierarchy between two suppliers by creating one supplier as child, or if you want create an employee as a supplier.
3. Enter a unique supplier name in Organization name field.
4. Enter the supplier’s tax id in tax field.
5. Click Apply. You will be navigated to suppliers page with info on the new supplier.


